

Roof Leak Repair Guide: How To Patch a Leaky Roof in 7 Steps
August 20,2025
8 Minute Read
Roof leak repair is something no homeowner wants to deal with, but knowing how to patch a leaky roof can save you time, money, and stress, especially when water starts sneaking in during a storm. Even a small leak can lead to soaked insulation, mold growth, or damaged ceilings if not handled quickly.
- Minor leaks can often be repaired without a full roof replacement
- Catching the problem early can help you avoid costly structural damage
- DIY roof repairs may be possible with the right tools and steps
Let’s walk through how to identify, patch, and prevent roof leaks like a pro.
Key Takeaways
- Common Culprits: Water intrusion usually stems from aging shingles, storm impact, or compromised seals around vents and chimneys.
- Detection Methods: Locate the source by checking for attic staining or using a hose to trace the water’s path.
- Essential Equipment: You will need a stable ladder, roofing cement, galvanized nails, and a pry bar for effective roof leak repair.
- Fixing Damage: Carefully remove old materials and inspect the wood deck before you patch a leaky roof with new shingles.
- Emergency Protection: Secure a weighted tarp over the ridge to shield your home until permanent repairs are possible.
- Proactive Care: Prevent future issues by scheduling annual inspections and keeping your drainage systems clear of debris.
- Professional Assistance: For widespread damage or complex structural issues, contact Heartland Roofing for an expert evaluation.
Why Roof Leaks Happen
A roof is your home’s first line of defense against weather, but even the strongest materials eventually wear down. Identifying the root cause of a roof leak can help you make smarter repair decisions and avoid future damage.
Understanding why a roof leak repair might become necessary is the first step in proactive home maintenance. While every structure is unique, most issues typically stem from one of these common culprits:
- Age and wear: Asphalt shingles usually last 20–30 years. As they age, they lose flexibility and granules, making them more likely to crack or curl and let water in.
- Storm or hail damage: High winds, hail, or falling debris can puncture shingles, lift flashing, or damage sealant. Even if the damage isn’t obvious, leaks may form later.
- Flashing failures: Flashing seals joints around chimneys, skylights, vents, and valleys. If it’s rusted, loose, or missing, water can easily seep beneath the roofing material.
Each of these vulnerabilities highlights why regular inspections are so valuable for the longevity of your home. By staying aware of how age, weather, and structural joints impact your shingles, you can address minor issues before they escalate. Ultimately, being proactive helps you navigate the roof leak repair process with confidence, ensuring your home remains dry and protected regardless of what the Iowa seasons bring.
How to Confirm a Roof Leak
Before patching a leak, you need to verify exactly where the water is getting in. That’s not always easy, since water can travel before it reveals itself inside your home. To master the necessary process of interior and exterior inspection, you must understand the methods experts use to how to find a roof leak quickly and accurately.
Taking the time to pinpoint the source ensures that your subsequent roof leak repair is effective and long-lasting, rather than just a temporary fix for a much larger issue. Use the tips below to help confirm the leak’s origin:
- Check your attic first: Use a flashlight to spot water stains, wet insulation, dark wood, or rusty nails. These are all signs that moisture is coming through from above.
- Use a hose test: Have someone spray the roof with a garden hose while you monitor the attic. Start at the lowest point and move upward to isolate the leak location.
- Watch for multiple entry points: Water can travel along rafters and appear far from the actual source. Look for more than one wet spot or stained area to rule out secondary issues.
Essential Tools for DIY Roof Leak Repair
If you’re planning to patch a roof leak yourself, make sure you have the proper tools and safety gear ready to go.
- Ladder with stabilizer: Keeps you balanced and avoids damaging the gutters
- Roofing nails and hammer: For securing new shingles or flashing
- Roofing cement or sealant: Used to seal small cracks, holes, or gaps
- Tarp or heavy-duty plastic sheeting: For temporary protection during a storm
- Utility knife and pry bar: For removing damaged shingles or flashing
- Caulk gun and roofing caulk: Seals flashing or vent edges
- Gloves and safety harness: Personal protection while working at height
7 Step Guide to Patch a Leaky Roof
Now that you’ve found the leak and gathered your tools, it’s time to get that roof leak repair done. Here’s a step-by-step breakdown of how to make a quick and effective patch.
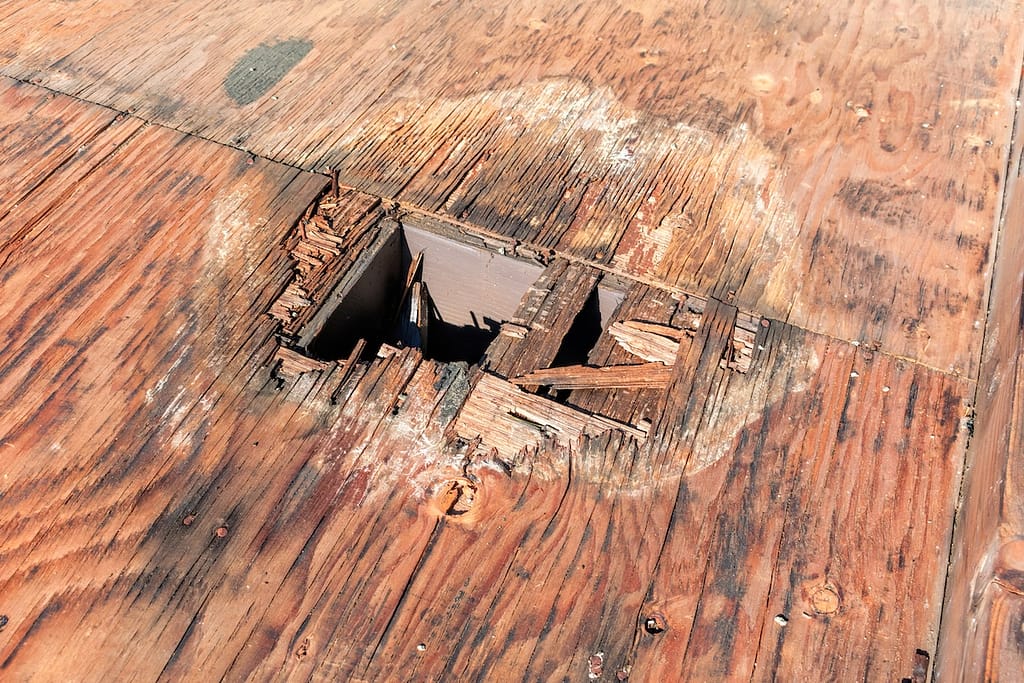
- Remove Damaged Shingles: Use a pry bar to lift the nails holding the damaged shingles in place. Carefully slide the shingle out so you don’t disturb the ones above it.
- Inspect the Roof Deck: Check the roof sheathing underneath for rot or softness. If the wood is spongy or crumbles, you may need to cut and replace a section of decking.
- Install New Underlayment: Before installing new shingles, make sure your underlayment is intact. Replace any torn or wet felt paper or synthetic underlayment to maintain a watertight seal.
- Nail Down Replacement Shingles: Slide in a new shingle to match the existing ones. Nail it into place using roofing nails, then cover nail heads with roofing cement to keep water out.
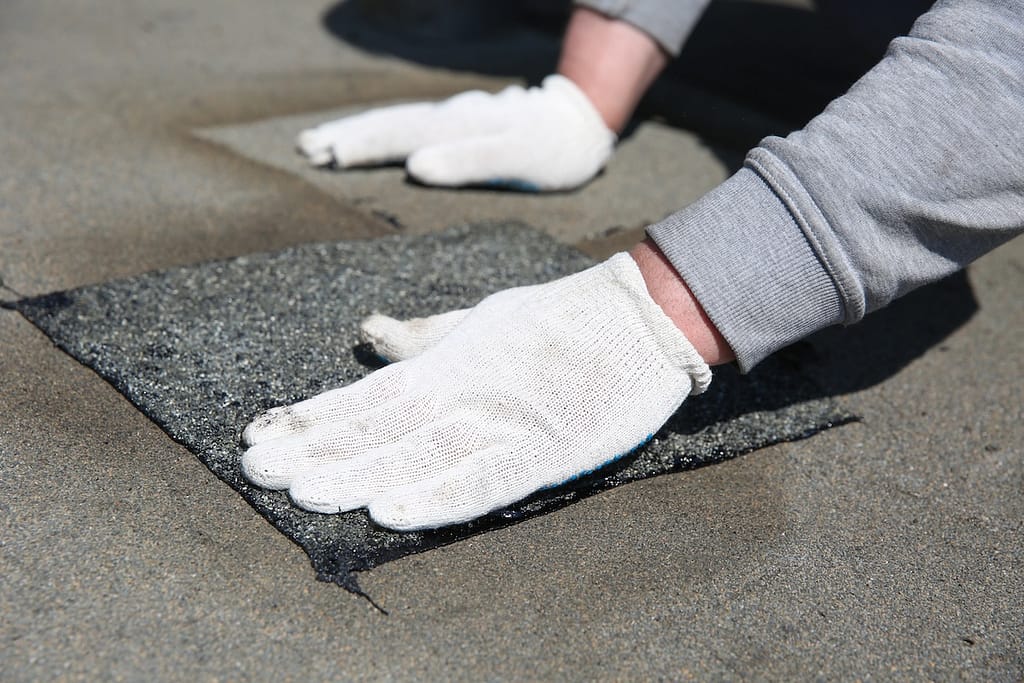
- Seal Flashing and Joints: Apply roofing caulk or sealant around flashing, vents, or chimney bases. Use a putty knife to press the sealant firmly into any gaps or cracks.
- Apply Roofing Cement for Small Holes: If your leak is from a nail hole or puncture, roofing cement can provide a simple patch. Spread a generous amount over the area using a putty knife, smoothing the edges.
- Test Your Repair: After everything is sealed and secure, wait for the next rain—or use the hose test again—to make sure no water sneaks in.
When to Use a Tarp as a Temporary Fix
Sometimes the roof leak repair can’t happen right away. In those cases, a roof tarp can help prevent additional damage while you wait for a professional. If you find yourself in this situation after a severe storm, it is crucial to know the immediate steps to take for an emergency roof repair to protect your home’s interior from further exposure.
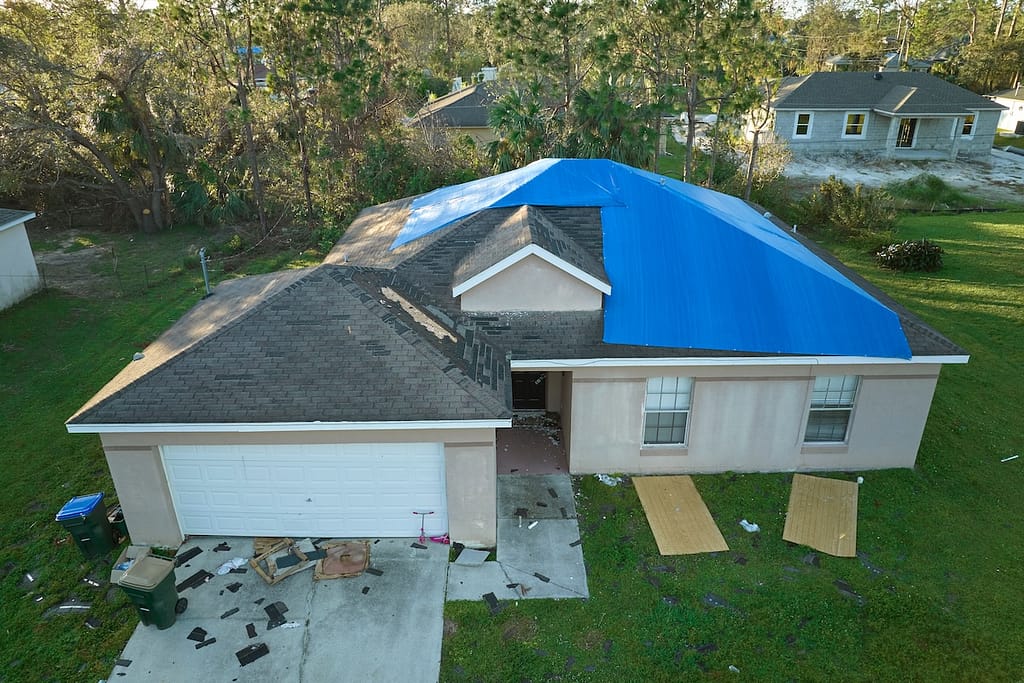
How to Tarp a Leaky Roof
- Choose a thick, waterproof tarp that extends at least 3 feet beyond the leak area
- Secure the tarp over the ridge line, not just the flat area
- Nail down 2×4 boards along each edge of the tarp to keep it from blowing off
- Avoid using duct tape or bungee cords—they’re not strong enough for wind or rain
A properly secured tarp will protect your home temporarily and buy you time until a permanent roof leak repair can be made.
Long-Term Roof Leak Prevention Tips
The best roof leak repair is one you never have to make. Regular maintenance and inspections are key to preventing future issues.
- Inspect your roof annually: Look for missing shingles, soft spots, or debris buildup
- Clean gutters and downspouts: Overflowing water can back up under shingles
- Trim overhanging branches: Falling limbs or leaf piles can create trouble
- Check attic insulation and ventilation: Poor airflow causes moisture buildup
- Seal flashing and joints: Reapply sealant around chimneys and vents as needed
By staying proactive with these simple tasks, you can significantly extend the lifespan of your shingles and minimize the risk of interior water damage. While regular maintenance is your first line of defense, knowing when to call Heartland Roofing for a professional roof leak repair ensures that small vulnerabilities are caught and corrected before they become costly emergencies.
When to Call a Professional Roofer
DIY fixes are helpful for minor problems, but some roof leaks require expert attention. If any of the following apply, it’s time to bring in the pros for a reliable roof leak repair:
- The leak is widespread or keeps returning
- You notice mold, soggy insulation, or ceiling collapse
- Your roof is over 15–20 years old and deteriorating
- You’re not comfortable working at heights
A qualified roofing contractor can thoroughly inspect the area and assess your entire roofing system to offer long-term solutions. By choosing a professional roof leak repair, you ensure that the root cause is addressed with high-quality materials, providing a permanent fix that goes far beyond a simple patch.
Get Reliable Roof Leak Repair From Heartland
Whether it’s a minor drip or a full-blown emergency, roof leak repair doesn’t have to be a guessing game. When water finds its way into your home, the priority is to stop the spread of moisture before it compromises your insulation or drywall.
By understanding the professional steps involved in a lasting fix, you can ensure your roof leak repair is handled correctly. Taking quick, informed action not only protects your property but also helps you avoid the bigger headaches and higher costs of structural damage down the road.
At Heartland, we help homeowners fix leaks fast—with expert service, premium materials, and honest recommendations. If you suspect a leak or want a second opinion on your DIY fix, contact Heartland today for a free inspection and repair estimate. We’re here to protect your home from the top down.

Get Started Today!
From roofing to siding, Heartland Roofing is the team you need to take your home exterior to the next level. All you need to do is reach out! Fill out our contact form or give us a call to get the reliable help that you need.


