

How To Clean Vinyl Siding Effectively (Step by Step)
September 23,2025
8 Minute Read
Knowing how to clean vinyl siding effectively can make a big difference in your home’s appearance and prevent long-term damage from mold, mildew, and grime. Vinyl is a low-maintenance material, but that doesn’t mean it never needs attention. Regular cleanings help preserve the siding’s color, prevent buildup, and keep your home looking sharp year-round.
- Cleaning siding once or twice a year extends its life
- You don’t need special tools, just the right technique and a little time
- Avoiding high-pressure or harsh chemicals protects your siding from damage
Let’s walk through the safest and most effective way to clean your vinyl siding, step by step.
Why Cleaning Vinyl Siding Matters
Vinyl siding is popular for its durability and low upkeep, but it’s not completely maintenance-free. Dirt, algae, mildew, and even spider webs can build up over time, especially on shaded or damp sides of your home.
Benefits of Routine Cleaning
- Improves curb appeal: A clean exterior gives your home a fresh, well-maintained appearance.
- Prevents staining: Organic buildup like algae or mildew can cause discoloration over time.
- Protects your siding: Keeping the surface free from debris reduces the risk of wear and tear.
- Supports home value: Especially important if you’re planning to sell or refinance.
Cleaning is one of the easiest and most affordable ways to maintain your home’s exterior—no replacement necessary.

What You’ll Need to Clean Vinyl Siding
Before starting, gather the right tools and materials. Most of these items are likely already in your garage or cleaning closet.
Basic Supplies
- Garden hose with spray nozzle
- Soft-bristle brush or siding cleaning brush
- Bucket of water
- Cleaning solution: Store-bought vinyl siding cleaner or a DIY mix (see below)
- Extension pole: Helpful for reaching upper stories
- Safety glasses and gloves: To protect your eyes and hands from cleaning agents
- Ladder (if needed): Only use if you’re confident in working safely at heights
DIY Cleaning Solution (Safe for Vinyl)
Mix the following in a large bucket:
- ⅓ cup of laundry detergent
- ⅔ cup of powdered household cleaner (like Spic & Span)
- 1 quart of household bleach (optional for mildew removal)
- 1 gallon of warm water
This solution is strong enough to cut through grime but gentle enough for most siding.
7 Step Guide For Cleaning Vinyl Siding
Regular upkeep not only boosts curb appeal but also helps your siding last longer. Follow these simple steps for a thorough, safe, and effective vinyl siding cleaning.
1. Inspect and Prepare the Area
Walk around your home to identify problem spots like heavy mildew, dirt streaks, or bug residue. Move outdoor furniture, potted plants, or anything else close to the walls. Cover delicate landscaping if you’re using bleach or commercial cleaners.
2. Start With a Hose Rinse
Use a garden hose to rinse the siding from bottom to top. This loosens surface dirt and prevents streaking when you start scrubbing. Avoid using a pressure washer unless you’re experienced—it can force water behind the panels and cause moisture damage.
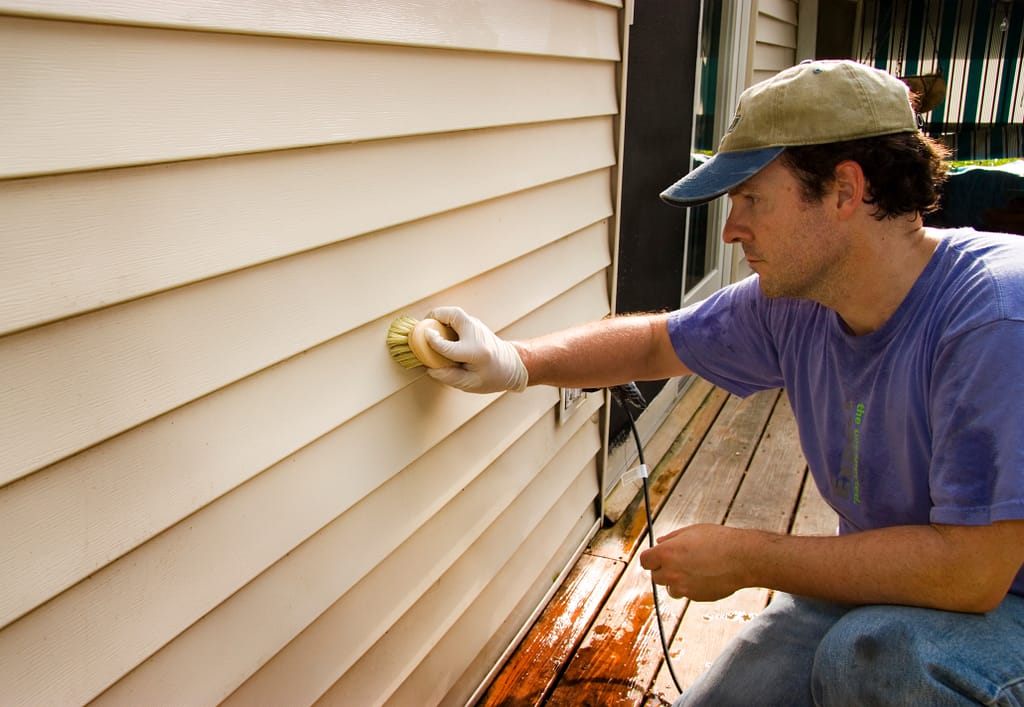
3. Scrub with Cleaning Solution
Dip your soft-bristle brush in the cleaning solution and begin scrubbing from the bottom up. Work in small sections, about 4–5 feet wide. Always scrub horizontally, following the lines of the siding panels.
- Use an extension pole for high areas, or move the ladder as needed.
- Focus on shaded sides of the home where mold and algae are most common.
4. Rinse Thoroughly as You Go
After scrubbing each section, rinse thoroughly with your garden hose from top to bottom. Don’t let the cleaning solution dry on the surface, it may leave streaks or residue.
5. Spot-Treat Stubborn Areas
For mildew or tough stains, apply a more concentrated solution and let it sit for 5–10 minutes before scrubbing again. You can also try a vinyl-safe cleaner like Simple Green, Wet & Forget, or a diluted vinegar mix.
6. Do a Final Rinse and Inspection
Once you’ve cleaned the entire exterior, give your siding a final rinse to remove any leftover soap or grime. Walk around the house and inspect your work, touch up any spots you may have missed.
7. Let It Air Dry
Vinyl siding dries quickly on its own. Let the surface air-dry naturally. You can use a clean microfiber cloth to wipe down areas around windows and trim if needed.
Common Vinyl Siding Stains and How to Remove Them
Not all siding stains are the same, and knowing what you are dealing with can make cleaning more effective. Different types of buildup require slightly different approaches to fully remove them without damaging the surface.
- Algae and mildew: Typically appear as green or black streaks and are best treated with a diluted bleach solution.
- Dirt and dust buildup: Easily removed with standard soap and water using a soft brush.
- Rust stains: Often caused by metal fixtures and may require a specialized vinyl-safe cleaner.
- Spider webs and insect residue: Can be removed with gentle scrubbing and a basic cleaning solution.
Targeting the specific type of stain helps prevent over-cleaning and protects the integrity of your siding.
Signs Your Vinyl Siding Needs More Than Cleaning
While routine cleaning is effective, there are times when vinyl siding may require repair or replacement instead. Recognizing these signs early can help prevent more serious issues.
- Cracks or warping: Indicates structural damage that cleaning will not fix.
- Fading or discoloration: May suggest UV damage or aging beyond restoration.
- Loose or missing panels: Can allow moisture behind the siding.
- Persistent mold or mildew: Could point to underlying moisture problems.
If cleaning does not improve the appearance or condition, it may be time to evaluate the siding more closely.
Best Weather Conditions for Cleaning Vinyl Siding
Choosing the right time to clean your siding can make the process easier and more effective. Weather conditions directly impact how well cleaning solutions work and how quickly surfaces dry.
- Mild temperatures: Ideal range is between 50 and 80 degrees for best results.
- Cloudy days: Prevent cleaning solutions from drying too quickly and leaving streaks.
- Low wind conditions: Helps keep water and cleaning solutions controlled.
- Dry forecast: Ensures siding can fully dry without additional moisture.
Cleaning under the right conditions improves results and reduces the risk of streaking or residue buildup.
What Not to Do When Cleaning Vinyl Siding
Cleaning vinyl siding is straightforward, but mistakes can lead to damage. Here’s what to avoid:
- Don’t use high-pressure washers unless you’re confident in proper technique—too much pressure can dislodge or warp panels.
- Avoid abrasive tools like steel wool or hard bristle brushes that can scratch the surface.
- Skip harsh chemicals such as undiluted bleach or acetone-based products. They can degrade the vinyl or strip away color.
- Never aim water upward beneath the siding laps—this forces moisture behind the panels, which can cause mold and rot.
Stick with gentle tools and a sensible cleaning method to keep your siding in top condition.
How Often Should You Clean Vinyl Siding?
For most homes, cleaning your vinyl siding once a year is enough to keep it looking great. However, you may need to clean more often if:
- Your home is in a shaded, damp, or wooded area
- You live in a humid or coastal region prone to mildew
- You notice algae or black streaks forming mid-season
- Your siding looks dull or faded before the year is up
Spring and early summer are ideal for siding cleaning, but you can tackle it any time the weather is dry and mild.
Should You Hire a Professional?
While DIY cleaning is effective for most homeowners, hiring a professional might be worth it if you’re dealing with stubborn stains, mold, or hard-to-reach areas. Professionals have the right tools and solutions to get the job done safely and efficiently.
- You have a multi-story home with hard-to-reach areas
- There’s heavy mold, mildew, or oxidation buildup
- You don’t feel comfortable using ladders or working outside for long periods
- You want a full exterior package that includes gutters, soffits, and windows
Professionals have the equipment and expertise to clean thoroughly without risking damage to your home or injury to yourself.
Keep Your Vinyl Siding Looking Like New With Heartland
Knowing how to clean vinyl siding effectively helps you preserve its appearance, prevent damage, and extend its lifespan. With just a few simple tools and the right technique, you can keep your home’s exterior looking sharp year after year.
Heartland is here to support your siding needs, from expert siding installation to full replacement. If your siding is worn, damaged, or ready for an upgrade.
Contact Heartland today for a free siding estimate! We’ll help you protect and enhance your home with durable, long-lasting solutions.

Get Started Today!
From roofing to siding, Heartland Roofing is the team you need to take your home exterior to the next level. All you need to do is reach out! Fill out our contact form or give us a call to get the reliable help that you need.


